The Ultimate Guide to Quarantine Tank Setup
Don’t gamble with your reef. This step-by-step quarantine tank guide shows you how to prevent outbreaks, reduce stress, and protect your livestock investment.
Why Every Saltwater Aquarist Needs a Quarantine Tank
Quarantine tank setup is your first line of defense against parasites, diseases, and stress that can devastate your entire marine aquarium. Here's what you need to know:
Essential Components:
- Tank Size: 20-gallon for fish up to 4 inches; 40-breeder for larger fish
- Filtration: Hang-on-back or sponge filter with seeded media
- Equipment: Heater, air pump, tight-fitting lid, PVC hides, ammonia monitor
- Setup: Bare bottom (no substrate), solid background for stress reduction
- Duration: 4-6 weeks minimum observation period
- Water Quality: Daily monitoring of ammonia, nitrite, temperature, and salinity
You can't always see parasites and pathogens with the naked eye. If they get into your display tank via a new fish or coral, they can infect the entire tank. In the worst-case scenario, you could have a complete wipeout, losing all your precious collection to disease.
Many beginners don't realize this, but setting up a quarantine tank is one of the easiest ways to stop your fish from getting sick. Even fish that look perfectly healthy can carry microscopic parasites like ich, velvet, or Acro Eating Flatworms (AEFW). A proper quarantine setup gives new arrivals time to recover from shipping stress while you observe them for any signs of illness—before they can harm your established livestock.
The good news? A quarantine tank doesn't need to be elaborate or expensive. A simple bare-bottom setup with basic filtration, a heater, and some PVC pipes for shelter is all you need. The key is having your equipment ready before you bring home new fish, not scrambling to set it up after a problem appears.
I'm Scott Hughes, and I've spent decades in the marine aquarium industry building sustainable practices around livestock health and quality at SaltwaterFish.com. Through years of experience with quarantine tank setup protocols, I've seen how proper isolation prevents catastrophic losses and protects valuable collections. Let me walk you through exactly how to set up an effective quarantine system that will keep your aquarium thriving for years to come.
Why a Quarantine Tank Setup is Essential
In the saltwater hobby, we often say there are two types of reefers: those who quarantine and those who wish they had. At Saltwaterfish.com, we’ve seen it all over our 26 years of global sourcing. A quarantine tank setup (often called a QT) isn't just a "nice-to-have" luxury; it is a critical insurance policy for your aquatic investment.
Battling Marine Parasites and Pathogens
The primary reason for a QT is the invisible nature of marine threats. Marine Ich (Cryptocaryon irritans) and Marine Velvet (Amyloodinium ocellatum) are the "Big Two" that haunt hobbyists. These parasites can be masked by the low levels of copper often used in fish stores, appearing only after the fish has settled into your display tank for a few weeks.
Furthermore, if you are an SPS coral enthusiast, you have to worry about Acro Eating Flatworms (AEFW) and Red Bugs. These pests can hitchhike on coral frags and decimate a colony in weeks. A dedicated quarantine tank setup allows you to inspect corals under a microscope and perform necessary dips, like Bayer, without introducing chemicals to your main reef.
Preventing Acclimation Stress and Cross-Contamination
When a fish arrives at your home, it has likely traveled thousands of miles. It is exhausted, its immune system is suppressed, and it is highly susceptible to "acclimation shock." By using a QT, you provide a quiet, low-stress environment where the fish can recover its strength and start eating before facing the social hierarchy of your display tank. This is a vital part of Preventing Acclimation Stress in Your Saltwater Aquarium.
Without a QT, a single sick fish can cause a complete tank wipeout. It’s much easier to treat one fish in a 20-gallon tank than it is to treat 15 fish in a 180-gallon reef full of sensitive corals and invertebrates that cannot tolerate medications like copper.
Essential Equipment for Your Quarantine Tank Setup
Setting up a quarantine system doesn't require the high-end gadgets of a display reef. In fact, simpler is usually better. You want a system that is easy to clean, easy to monitor, and won't absorb the medications you might need to use.
The "Must-Have" Checklist:
- The Aquarium: A standard glass tank is preferred over plastic totes because it allows for clear observation of the fish's skin, fins, and swimming behavior.
- Ammonia Monitoring: This is the biggest killer in QTs. We highly recommend the Seachem Ammonia Alert badge. It stays inside the tank and changes color the moment ammonia becomes toxic, which is crucial since some medications can interfere with traditional liquid test kits.
- Heater: A reliable heater is necessary to keep temperatures stable. For a 20-gallon tank, a 75W heater is usually sufficient.
- Air Pump and Bubbler: Medications often deplete oxygen levels in the water. An air pump with an air stone ensures high levels of dissolved oxygen.
- Tight-Fitting Lid: Stressed fish are jumpers. Use a glass top, acrylic lid, or even "egg crate" (plastic light diffuser). Egg crate is excellent because it allows for maximum gas exchange while keeping the fish inside.
- PVC Hides: Do not use live rock or sand. Instead, use PVC elbows or T-joints. They provide shelter but won't absorb medications like copper.
- Solid Background: Taping black or blue paper to the back and sides of the tank helps the fish feel secure and reduces "glass banging" stress.
Choosing the Right Size for Your Quarantine Tank Setup
Size matters, but bigger isn't always better. A smaller tank is cheaper to medicate (you use less product) and easier to perform large water changes on. However, if the tank is too small, ammonia can spike rapidly.
| Fish Size | Recommended Tank Size | Dimensions (Approx.) |
|---|---|---|
| Up to 4 inches | 20 Gallon Long | 30" x 12" x 12" |
| 4 to 8 inches | 40 Gallon Breeder | 36" x 18" x 16" |
| Large Tangs/Angels | 75 Gallon | 48" x 18" x 21" |
For most hobbyists, a 20-gallon long is the "Goldilocks" size. It provides enough swimming room for most common additions while remaining manageable.
Filtration and Aeration for Your Quarantine Tank Setup
In a quarantine tank setup, we aren't looking for complex nutrient export like protein skimmers or refugiums. We need simple, effective biological filtration.
- Hang-On-Back (HOB) Filters: Models like the AquaClear Power Filter are favorites because they have a large media capacity. You can easily swap out sponges or ceramic rings.
- Sponge Filters: These are the most cost-effective option. They provide both biological filtration and aeration.
- Seeded Media: The "secret sauce" to a successful QT is using media that has been "seeded" in your display tank's sump for at least 4-6 weeks. This media is already teeming with beneficial bacteria, allowing you to bypass the traditional month-long cycle.
Aeration is equally important. Many medications, especially those used to treat velvet or flukes, can cause a bacterial bloom that consumes oxygen. Always ensure you have plenty of surface agitation. If the water surface is "boiling" slightly from your filter or air stone, you’re doing it right.
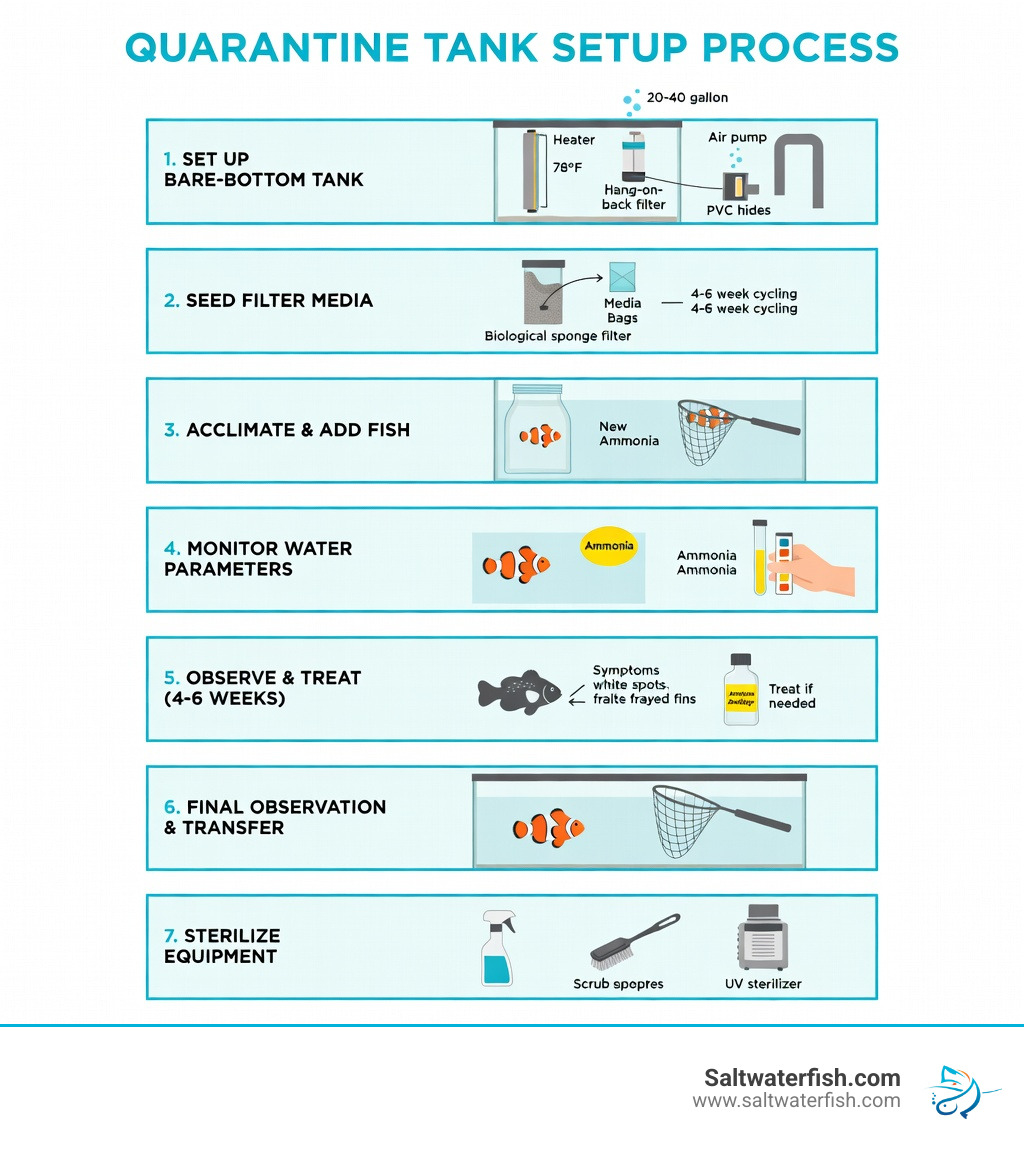
Step-by-Step Guide to Setting Up Your Quarantine Tank
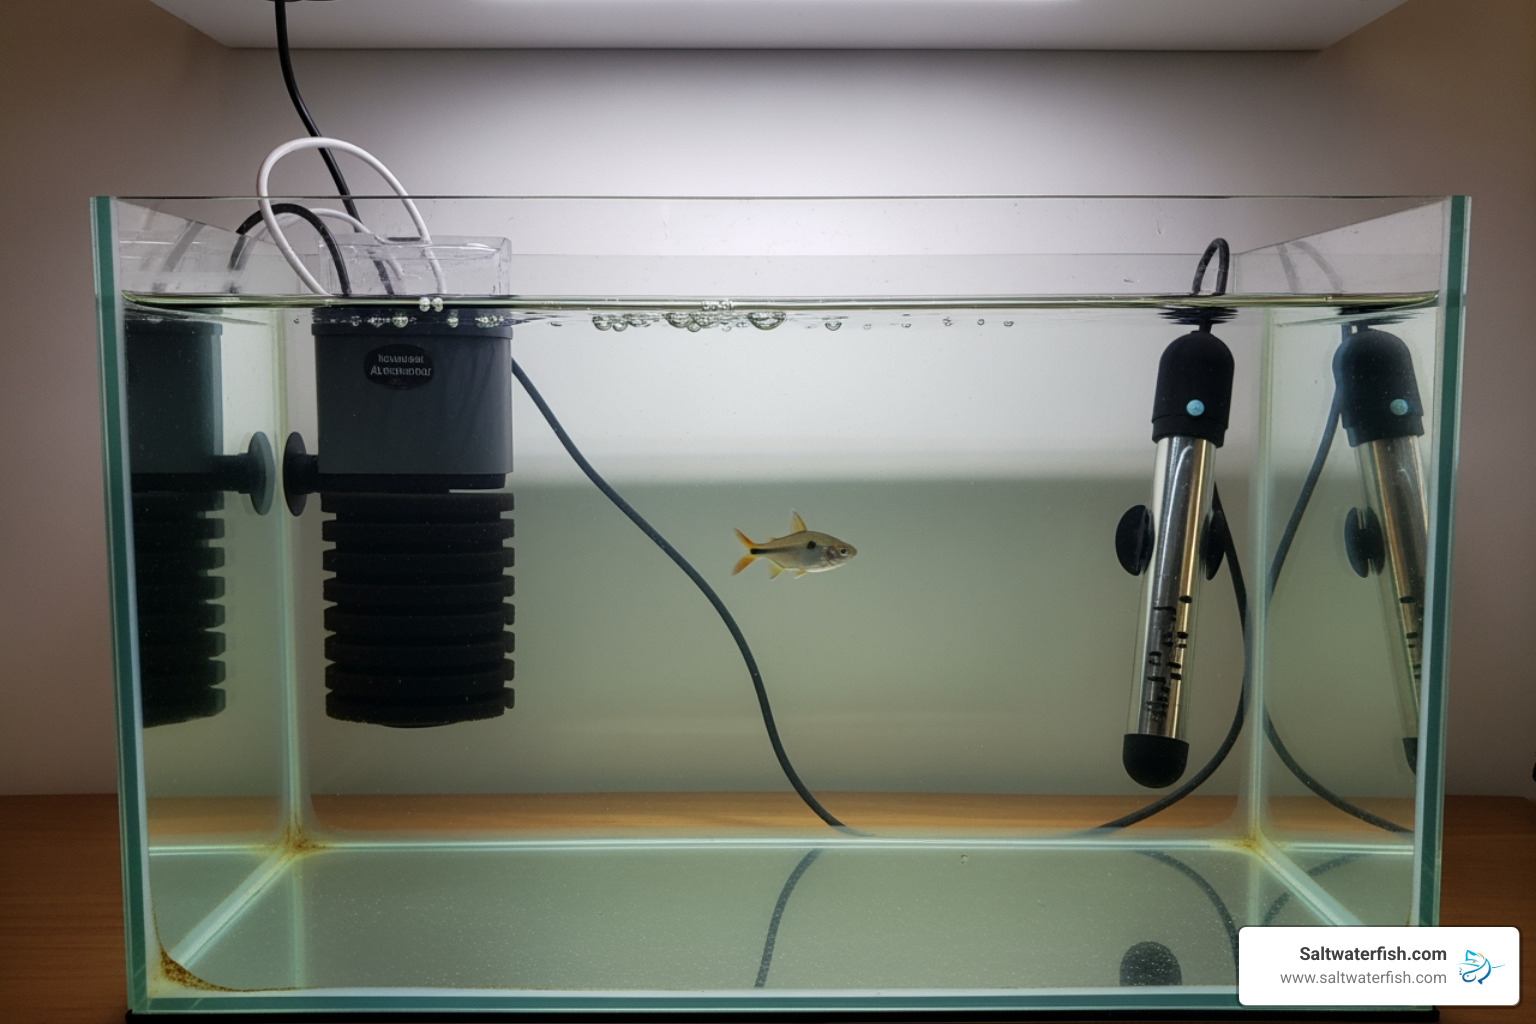
Now that we have our gear, let's put it all together. The goal is a sterile, functional environment.
- Position the Tank: Place it in a low-traffic area of your home to minimize external stress. Ensure it's far enough away from your display tank to prevent "aerosolization" of pathogens (yes, bubbles popping can spray microscopic parasites into the air!).
- The Bare Bottom Rule: Do not add sand or gravel. Substrate provides a home for parasites like Ich to complete their life cycle. A bare bottom makes it incredibly easy to siphon out uneaten food and fish waste, which is a core part of Easy Steps to Ensure Top-Notch Water Quality in Your Saltwater Aquarium.
- Fill and Condition: Use fresh saltwater mixed to the same salinity as your display tank (typically 1.025-1.026). If you're in a hurry, you can use water from your display tank for the initial fill to match parameters perfectly, but always use fresh saltwater for subsequent water changes.
- Install the "Engine": Add your heater and your seeded filter media. If you don't have seeded media, you must use a "bacteria in a bottle" product like Fritz Turbostart or Seachem Stability. Dose these at least a week before adding fish.
- Add Shelter: Toss in those PVC pipes. Give them a quick rinse first!
Managing Water Quality and Medication Protocols
Once the fish is in the tank, your job shifts to monitoring. Ammonia is your biggest enemy here. Even with a seeded filter, the biological load of a new fish can cause a spike.
- The Hanna Check: For the most accurate readings, the Hanna Ammonia Checker is a fantastic tool that works even when copper medications are present.
- Medication Protocols: Many experts recommend a "proactive" approach. This often involves ramping up copper (like Copper Power or Cupramine) to therapeutic levels over 4-5 days.
- The "Trifecta": Some hobbyists use a combination of Copper (for Ich/Velvet), Metronidazole (for internal parasites and Brooklynella), and Praziquantel (for flukes).
- Top-Offs: Evaporation will raise your salinity, which can make medications more toxic. Mark the water line on the glass and top off daily with fresh RO/DI water.
Final Steps for a Successful Quarantine Tank Setup
How long should the fish stay in "fishy jail"? We recommend a quarantine duration of 4-6 weeks.
During this time, observe the fish daily. Is it eating? Are its fins clear? Is it breathing heavily or scratching against the PVC? If you see symptoms, the "quarantine clock" resets. You should only move the fish to your display tank after it has been symptom-free for at least 14-21 days post-treatment.
When the quarantine is over, do not just pour the QT water into your display tank. Drip acclimate the fish to the display tank water, then net the fish out and place it into the display.
Cleanup and Storage: Once the QT is empty, bleach everything or wash it thoroughly with vinegar and hot water. Discard the filter sponges—they are cheap, and it’s not worth the risk of cross-contamination for your next batch of fish. Dry everything completely before storing.
Frequently Asked Questions about Quarantine Tank Setup
Can I use a bucket as a quarantine tank?
In a pinch? Yes. A food-safe, 5-gallon bucket can work as a temporary hospital tank for a very small fish. However, it’s far from ideal. You can’t see the fish through the sides of the bucket, making it nearly impossible to spot early signs of Ich or Velvet. Plus, the small water volume means ammonia will build up almost instantly. If you must use a bucket, you’ll need to do 50% water changes daily and provide heavy aeration.
Do I need to quarantine my very first fish?
Technically, if your display tank is empty, it is a quarantine tank. However, we still recommend using a separate quarantine tank setup. Why? Because it’s much easier to catch and treat a sick fish in a small, bare-bottom tank than in a large display with 100 pounds of live rock. Plus, it establishes the good habit of quarantining from day one. It’s about building a foundation for long-term success.
Should shrimp and snails be quarantined?
While invertebrates like shrimp and snails don't catch "fish diseases" like Ich, they can absolutely carry the "tomont" (resting) stage of these parasites on their shells. If you want to be 100% safe, you should quarantine invertebrates in a fishless system for 76 days (the maximum life cycle of Ich).
For most, a thorough rinse with clean saltwater is the minimum. However, corals should always be dipped to prevent AEFW and Red Bugs. A single AEFW egg can survive most dips, so a 30-day observation period for corals is highly recommended.
Conclusion
A quarantine tank setup is the hallmark of an experienced aquarist. It represents a shift from "hoping for the best" to "ensuring the best." By taking the time to isolate and observe your new arrivals, you are respecting the life of the animals and protecting the ecosystem you’ve worked so hard to build.
At Saltwaterfish.com, we pride ourselves on expert sourcing and providing the healthiest livestock possible. But even with the best care in the world, the stress of moving can trigger underlying issues. Using this guide, you can create a safe harbor for your new fish to transition into their forever home.
Ready to start your journey? Check out our Essential Guide to Saltwater Aquarium for Beginners for more tips on building a thriving reef! Happy reefing, and remember: when in doubt, quarantine it out!